こんにちは。
FlutterのGridviewでDrag and Dropで要素のソートをしてみたいと思います。前回はListviewで同じような事をしましたので、Listviewを試したい方は以下リンクからどうぞ。
あわせて読みたい

flutterのListviewでDrag and Dropを使う
こんにちは。 FlutterのListviewでDrag and Dropで要素のソートをしてみたいと思います。 【ReorderableListViewでリストのDrag and Drop】 ReorderableListViewを使っ...
目次
DragAndDropGridViewでGridのDrag and Drop
drag_and_drop_gridviewというライブラリをインストールして実現します。インストールはこちらを参考に実施してください。
Drag and Drop要素の準備
Grid1つ1つのクラスCategoryIconを作成します。cateiconListにGridに表示するものをCategoryIconクラスで定義します。
class CategoryIcon {
  String title;
  IconData icon;

  CategoryIcon(
      this.title,
      this.icon,
      );
}

class ListCondition extends StatefulWidget {

  final String category_key;
  final String category_title;
  final Color category_color;

  const ListCondition({
    Key key,
    this.category_key,
    this.category_title,
    this.category_color,
  }) : super(key: key);

  @override
  _ListConditionState createState() => _ListConditionState();
}

class _ListConditionState extends State<ListCondition> {
  List<CategoryIcon> cateiconList;

  @override
  void initState() {
    super.initState();

    cateiconList = [
      CategoryIcon('Cake',Icons.cake),
      CategoryIcon('Bicycle',Icons.directions_bike),
      CategoryIcon('Boat',Icons.directions_boat),
      CategoryIcon('Star',Icons.star),
      CategoryIcon('Call',Icons.call_end_sharp),
      CategoryIcon('Favorite',Icons.favorite),
    ];
  }
要素の並べ替え
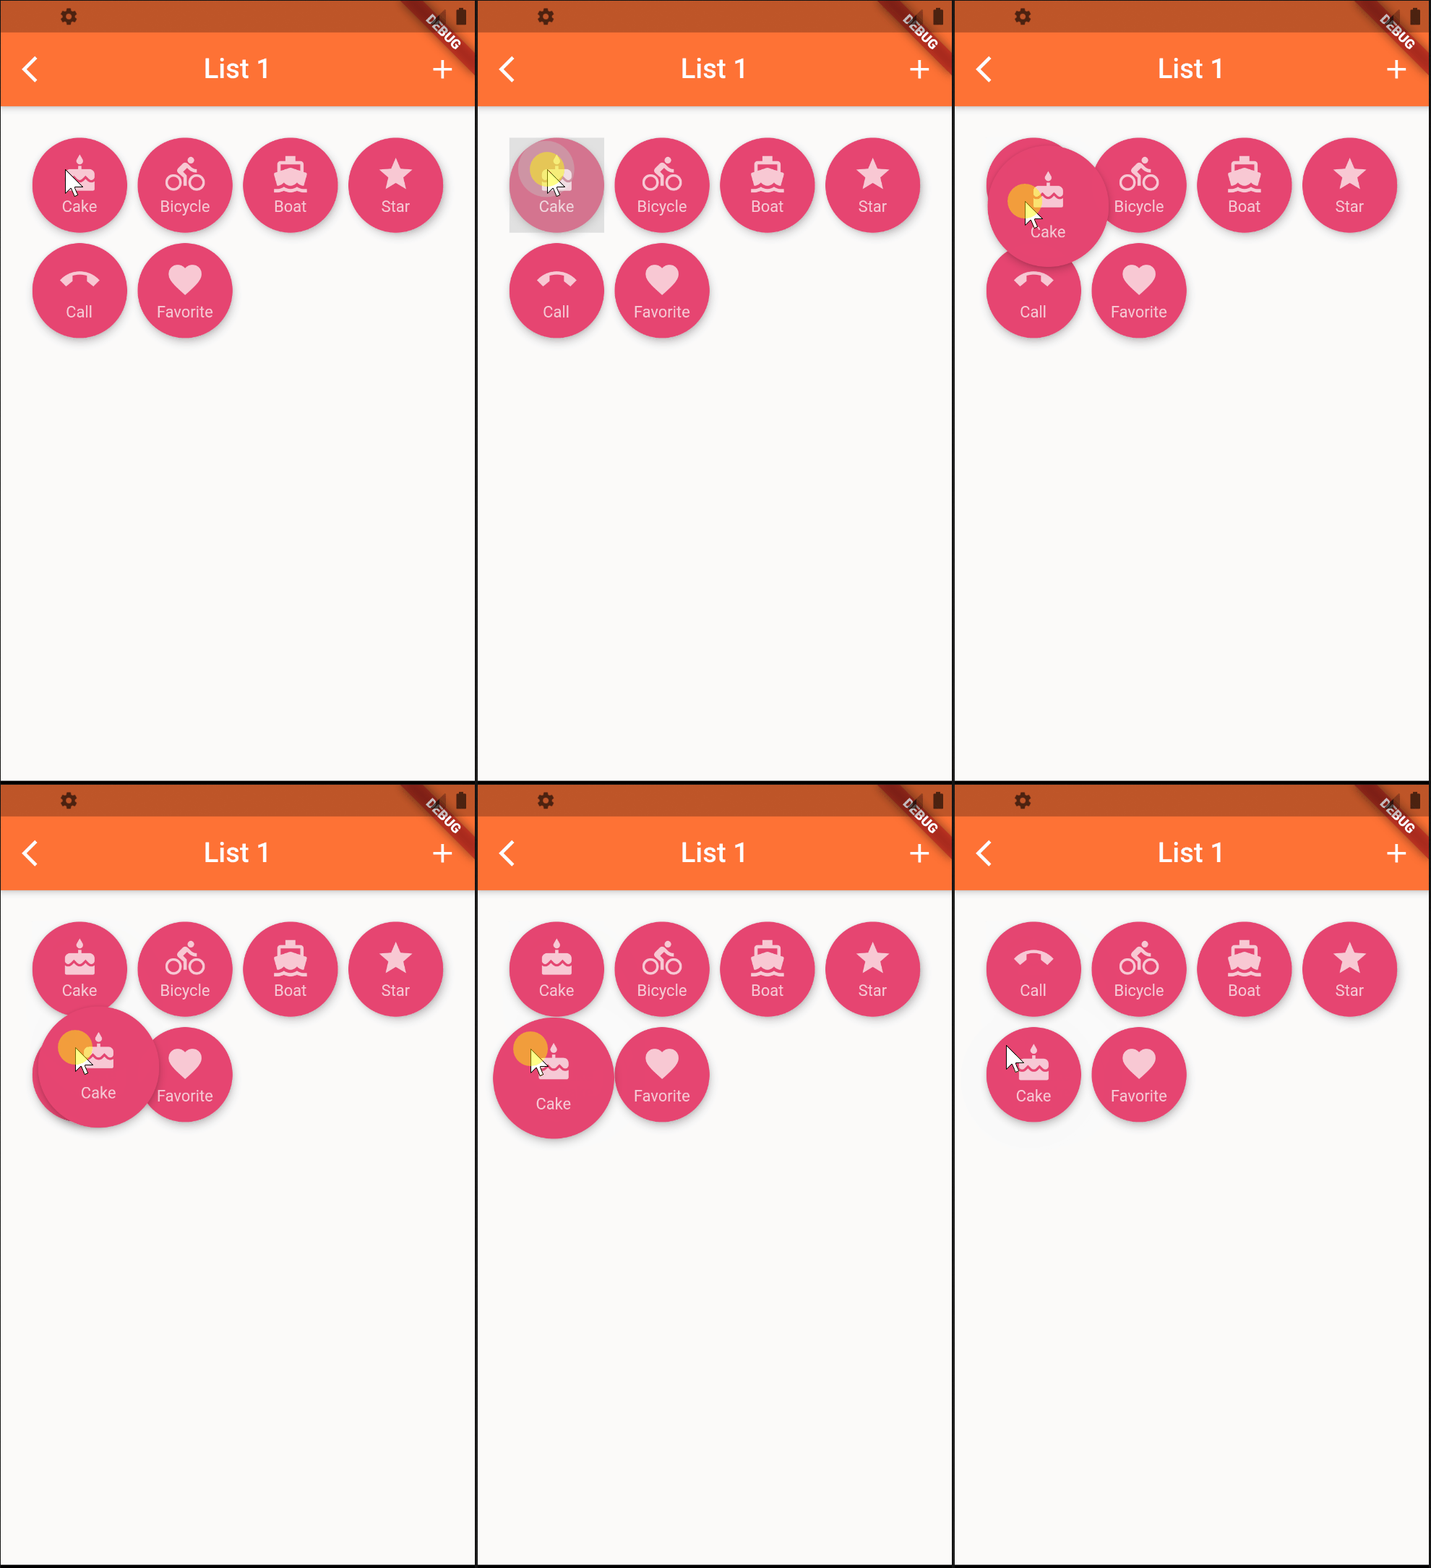
DragAndDropGridViewで並び替えをする場合は、gridDelegate、itemBuilder、onWillAccept、onReorderが必須です。gridDelegateは公式GridViewと同じもので、子のレイアウトを制御します。itemBuilderも公式GridViewと同じもので、子アイテムを作成します。onWillAcceptは順序変更を受け入れを制御できます。常に変更を受け入れたい場合はtrueを返します。onReorderはインデックスの変更を処理します。
それぞれの使い方詳細は以下サイト参考にしてください。
https://pub.dev/packages/drag_and_drop_gridview
class _ListConditionState extends State<ListCondition> {
  ・・・・

  int variableSet = 0;
  ScrollController _scrollController;
  double width;
  double height;

  @override
  Widget build(BuildContext context) {
    return Scaffold(
      resizeToAvoidBottomInset : false,
      appBar: TransAppBar(
        title: Text(widget.category_title),
        appBar: AppBar(),
        widgets: <Widget>[
          Padding(
            padding: const EdgeInsets.only(right: 0.5),
            child: IconButton(
              icon: Icon(Icons.add),
              onPressed: () {
                Navigator.push(
                  context,
                  MaterialPageRoute(builder: (context) => SelectIcon()),
                );
              },
            ),
          )
        ],
      ),
      body: DragAndDropGridView(
          controller: _scrollController,
          gridDelegate: SliverGridDelegateWithFixedCrossAxisCount(
            crossAxisCount: 4,
            childAspectRatio: 1 / 1,
          ),
          padding: EdgeInsets.all(20),
          itemBuilder: (context, index) => Card(
            shape: RoundedRectangleBorder(
                borderRadius: BorderRadius.circular(100.0)),
            elevation: 5,
            color: widget.category_color,
            child: InkWell(
              onTap: () {
                Navigator.push(
                  context,
                  MaterialPageRoute(
                    builder: (context) => EditCondition(
                      condition_key: '1',
                      condition_title: cateiconList[index].title,
                      condition_color: widget.category_color,
                      condition_icon: cateiconList[index].icon,
                    ),
                  ),
                );
              },
              child: LayoutBuilder(
                builder: (context, costrains) {
                  if (variableSet == 0) {
                    height = costrains.maxHeight;
                    width = costrains.maxWidth;
                    variableSet++;
                  }
                  return GridTile(
                    child: Padding(
                      padding: const EdgeInsets.all(10.0),
                      child: SizedBox(
                        height: height,
                        width: width,
                        child: Column(
                          mainAxisAlignment: MainAxisAlignment.spaceEvenly,
                          children: [
                            Icon(
                              cateiconList[index].icon,
                              size: 30,
                              color: Colors.white70,
                            ),
                            Text(
                              cateiconList[index].title,
                              style: TextStyle(
                                fontSize: 12,
                                color: Colors.white70,
                              ),
                            ),                       ],
                        ),
                      ),
                    ),
                  );
                },
              ),
            ),
          ),
          itemCount: cateiconList.length,
          onWillAccept: (oldIndex, newIndex) => true,
          onReorder: (oldIndex, newIndex) {
            final temp = cateiconList[oldIndex];
            cateiconList[oldIndex] = cateiconList[newIndex];
            cateiconList[newIndex] = temp;

            setState(() {});
          },
        ),
    );
  }
}







コメント