こんにちは。
記録系のアプリで入力したデータは自分で自由に分析出来るように元データが欲しい、と思う人は少なくないと思います。どのような仕組みになっているのが楽かなぁと思った時に、自分のGoogleDriveにSpreadsheetでデータが保存出来たら、見やすいし加工もしやすいです。
という事で、ざっくり以下構成で解説します。今日はGoogleにログインするです。
- Googleにログインする
- GoogleDriveにSpreadsheetを作成してデータを入れる
前提
- Android Studioにてアプリを作成する前提で解説しております。
- アプリに自前でGoogleログイン機能を追加するのはとても大変なので、Firebaseの認証機能などのプラグインを使っていきます。そのため、Firebaseの設定も必要になります。
プラグインインストール
必要なプラグインは次のとおりです。
| firebase_core | FirebaseCoreAPIを使用するFlutterプラグイン (Firebase初期化の使用) |
| firebase_auth | FirebaseAuthenticationAPIを使用するためのプラグイン (Firebase認証機能の使用) |
| google_sign_in | Googleサインインを使用する |
pubspec.yamlに以下を追加します。
dependencies:
 ・・・
  firebase_core: ^1.8.0
  firebase_auth: ^3.1.4
  google_sign_in: ^5.1.1
そして「flutter pub get」でインストールします。
設定(Android編)
基本的には、こちらに書いてある事をします。
Firebase Console(https://console.developers.google.com/)からプロジェクトを新規作成します。
プロジェクトを作成したら、設定をしていきます。
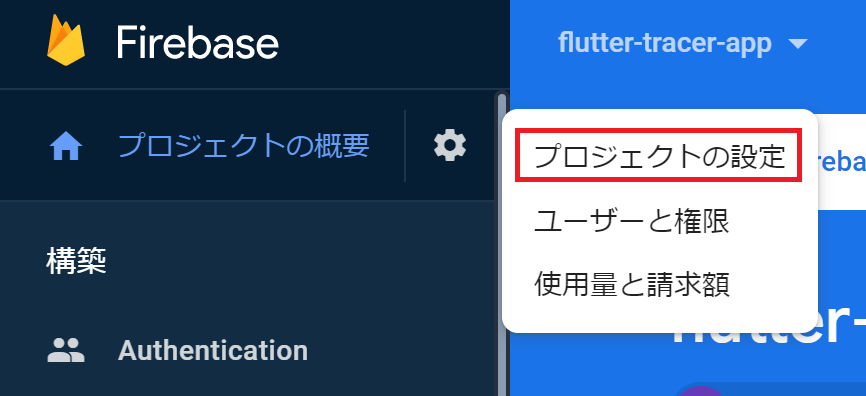
[プロジェクトの設定]からアプリを追加します。
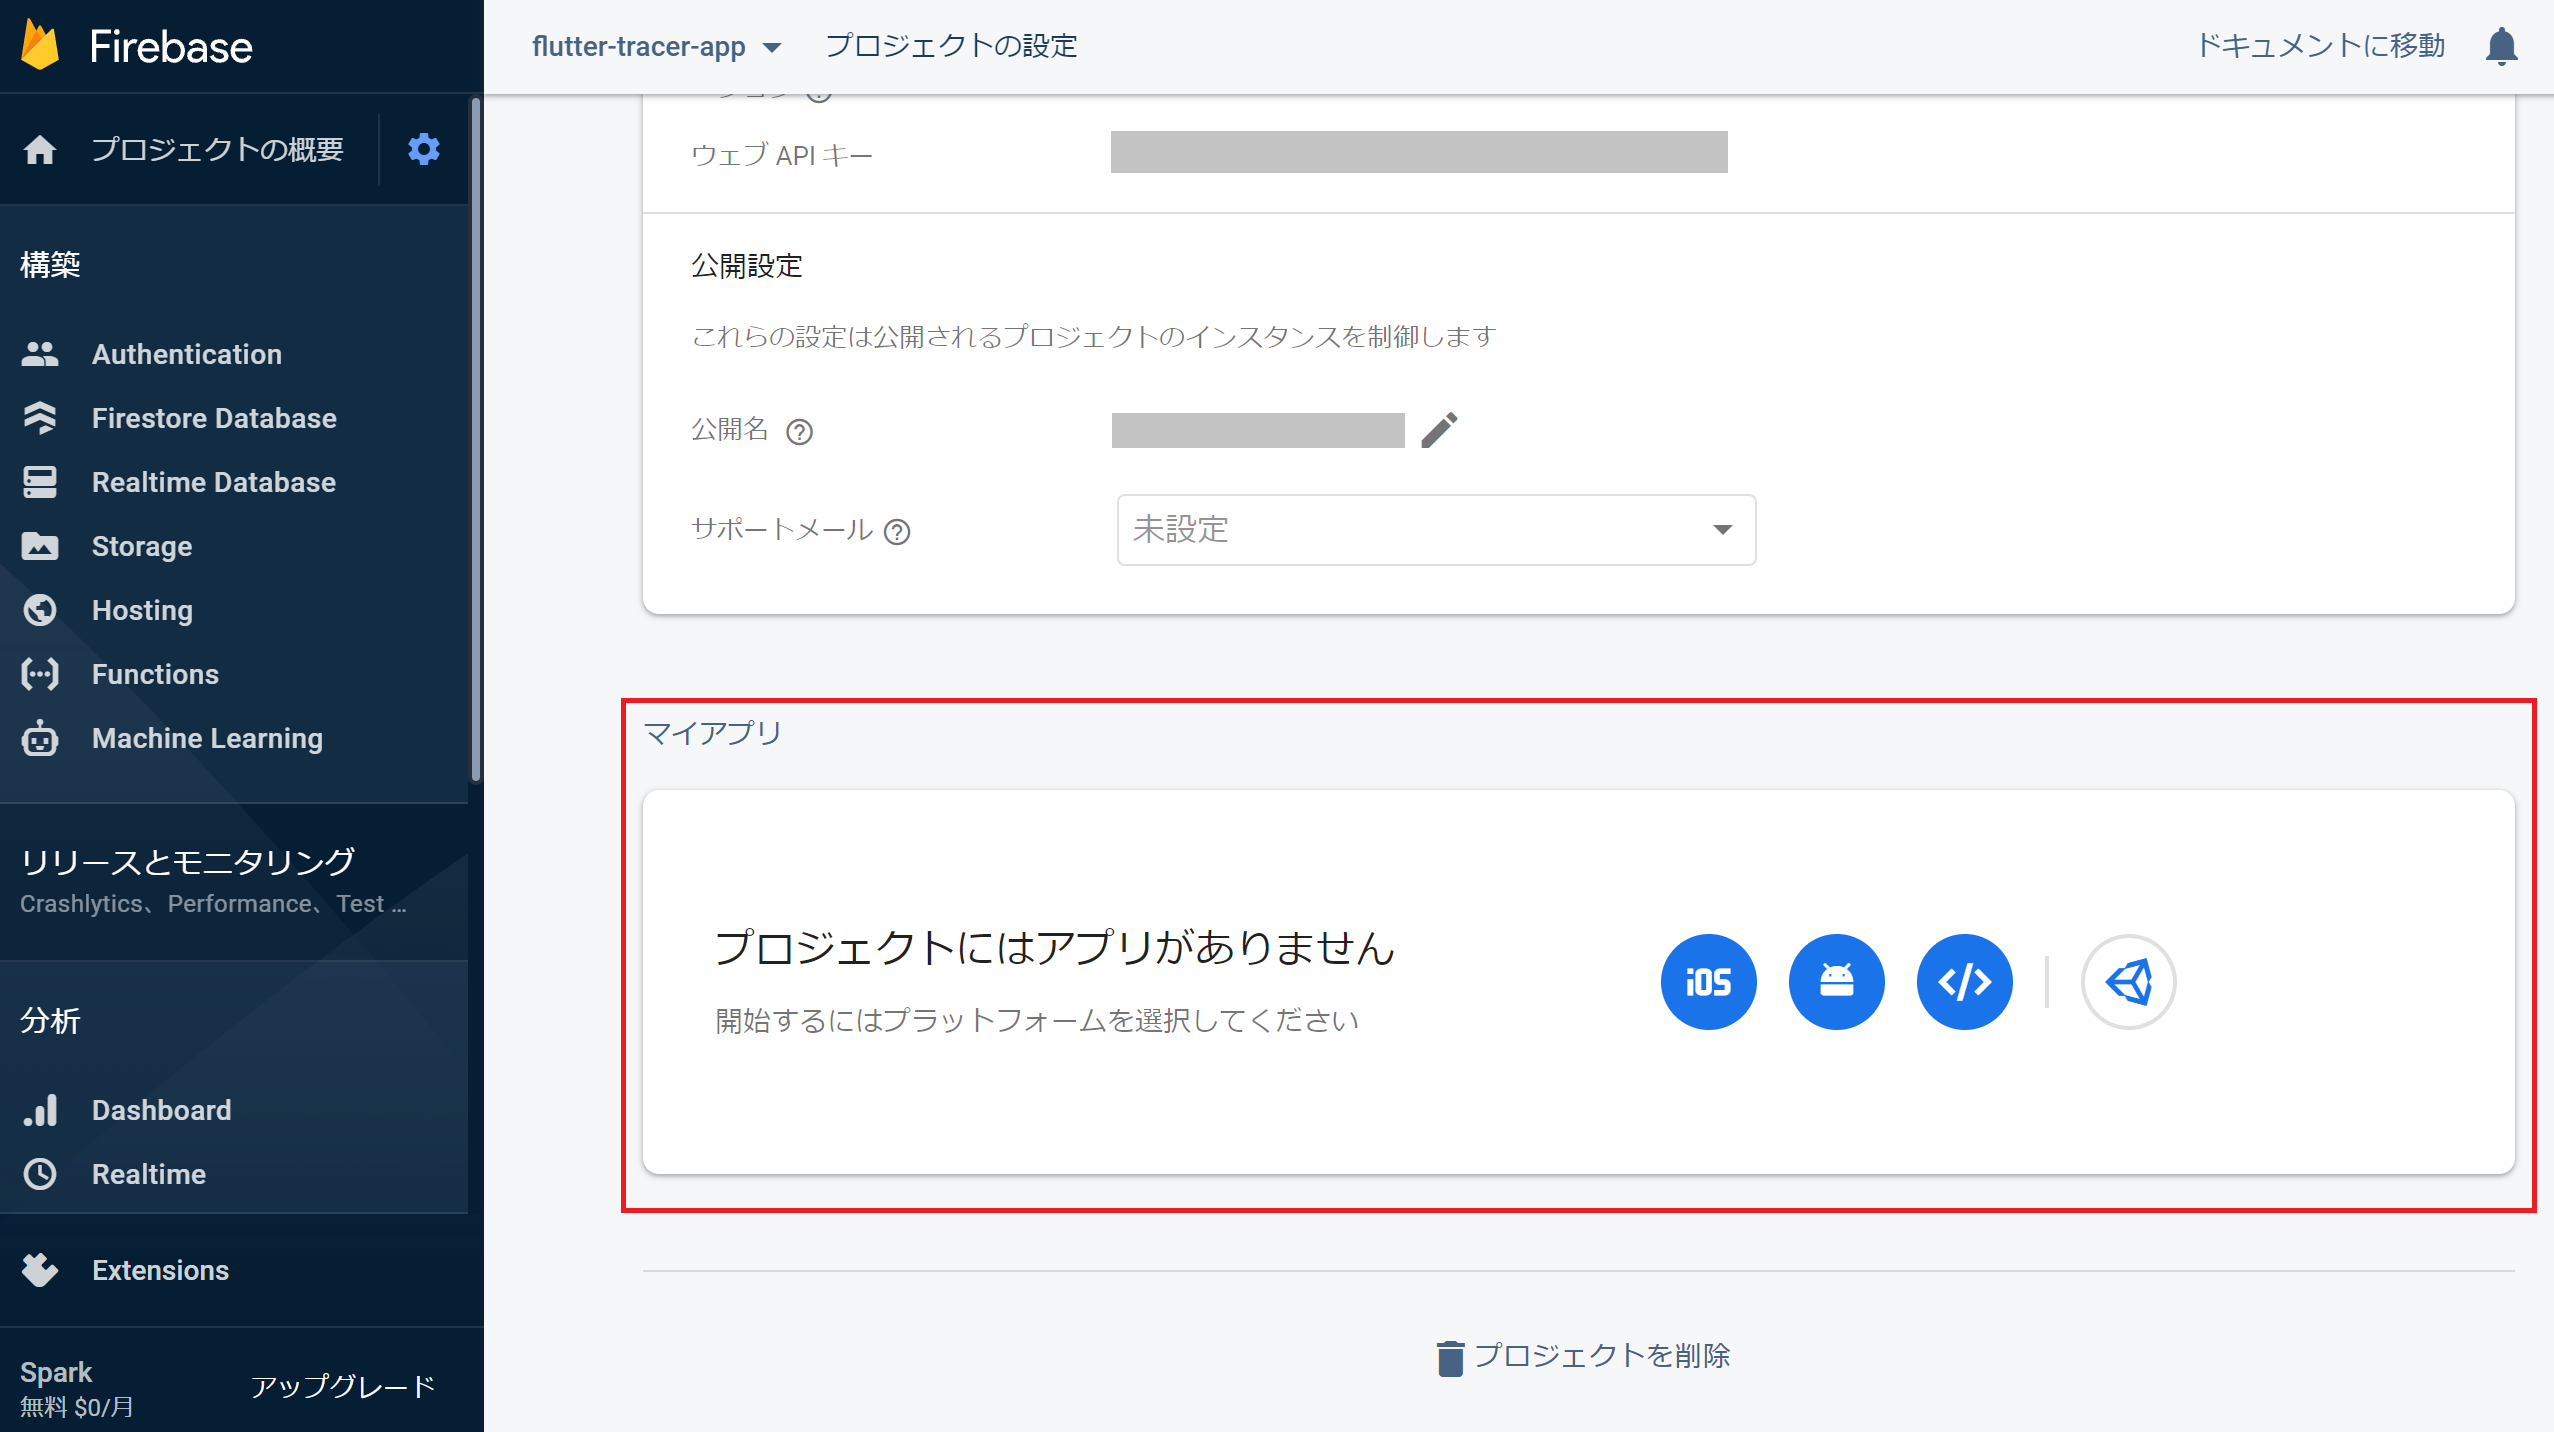
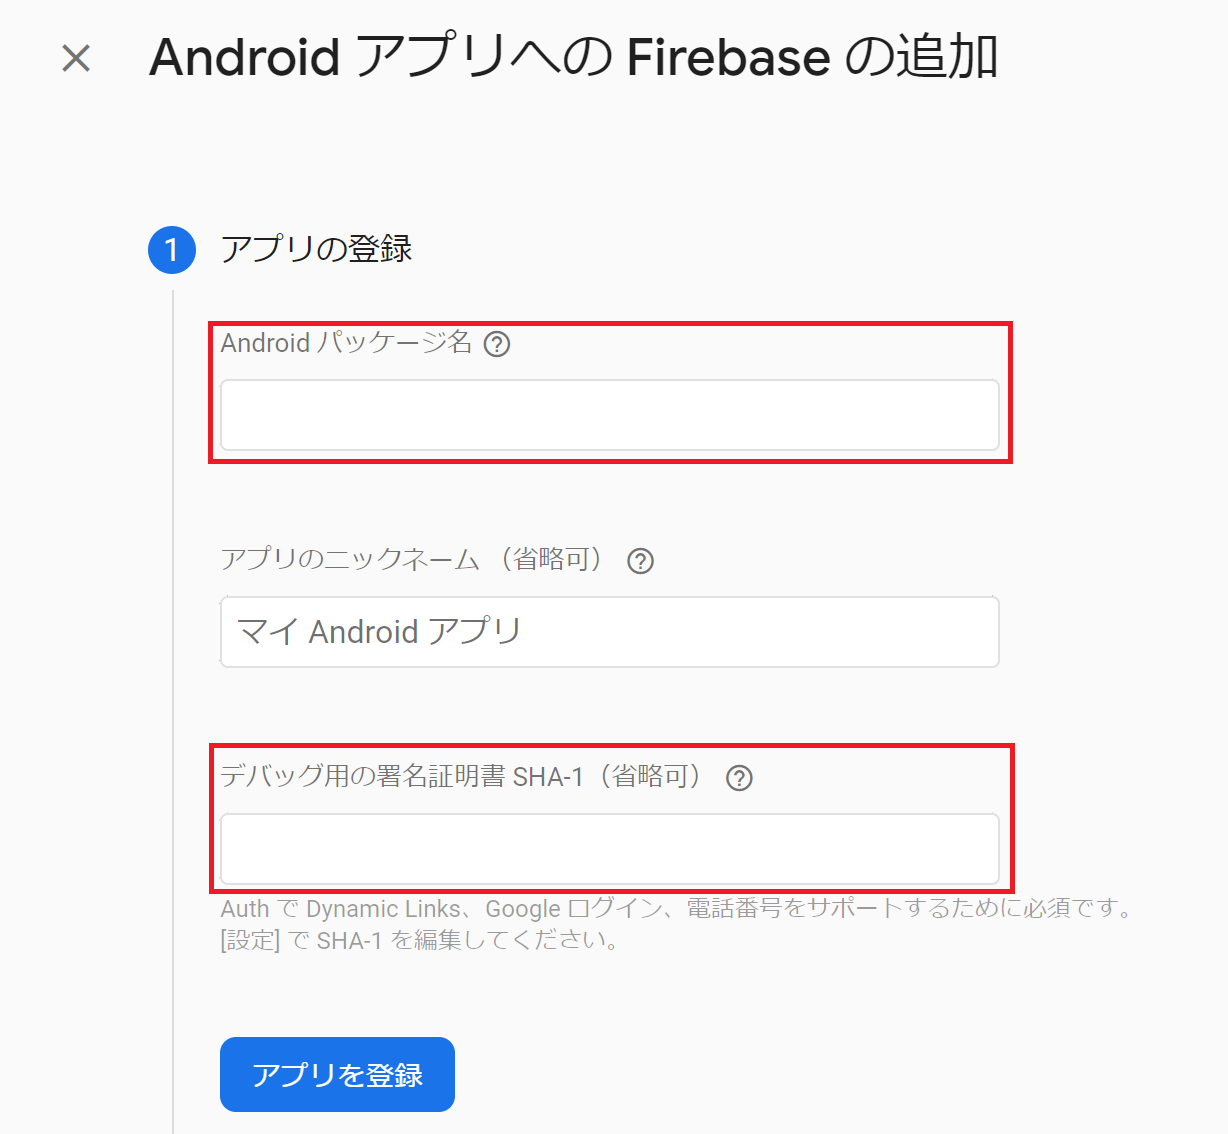
以下にて、Androidパッケージ名とデバッグ用の署名証明書SHA1を入力します。
SHA1はこちらのサイトに取得方法が記載されていますが、WindowsでAndroidStudioをお使いの方は以下のようにします。
コマンドプロンプトを起動して、以下を入力します。
>cd C:\Program Files\Android\Android Studio\jre\bin
>keytool -list -v -alias androiddebugkey -keystore %USERPROFILE%\.android\debug.keystore
「キーストアのパスワードを入力してください:」と言われるので「android」と入力します。
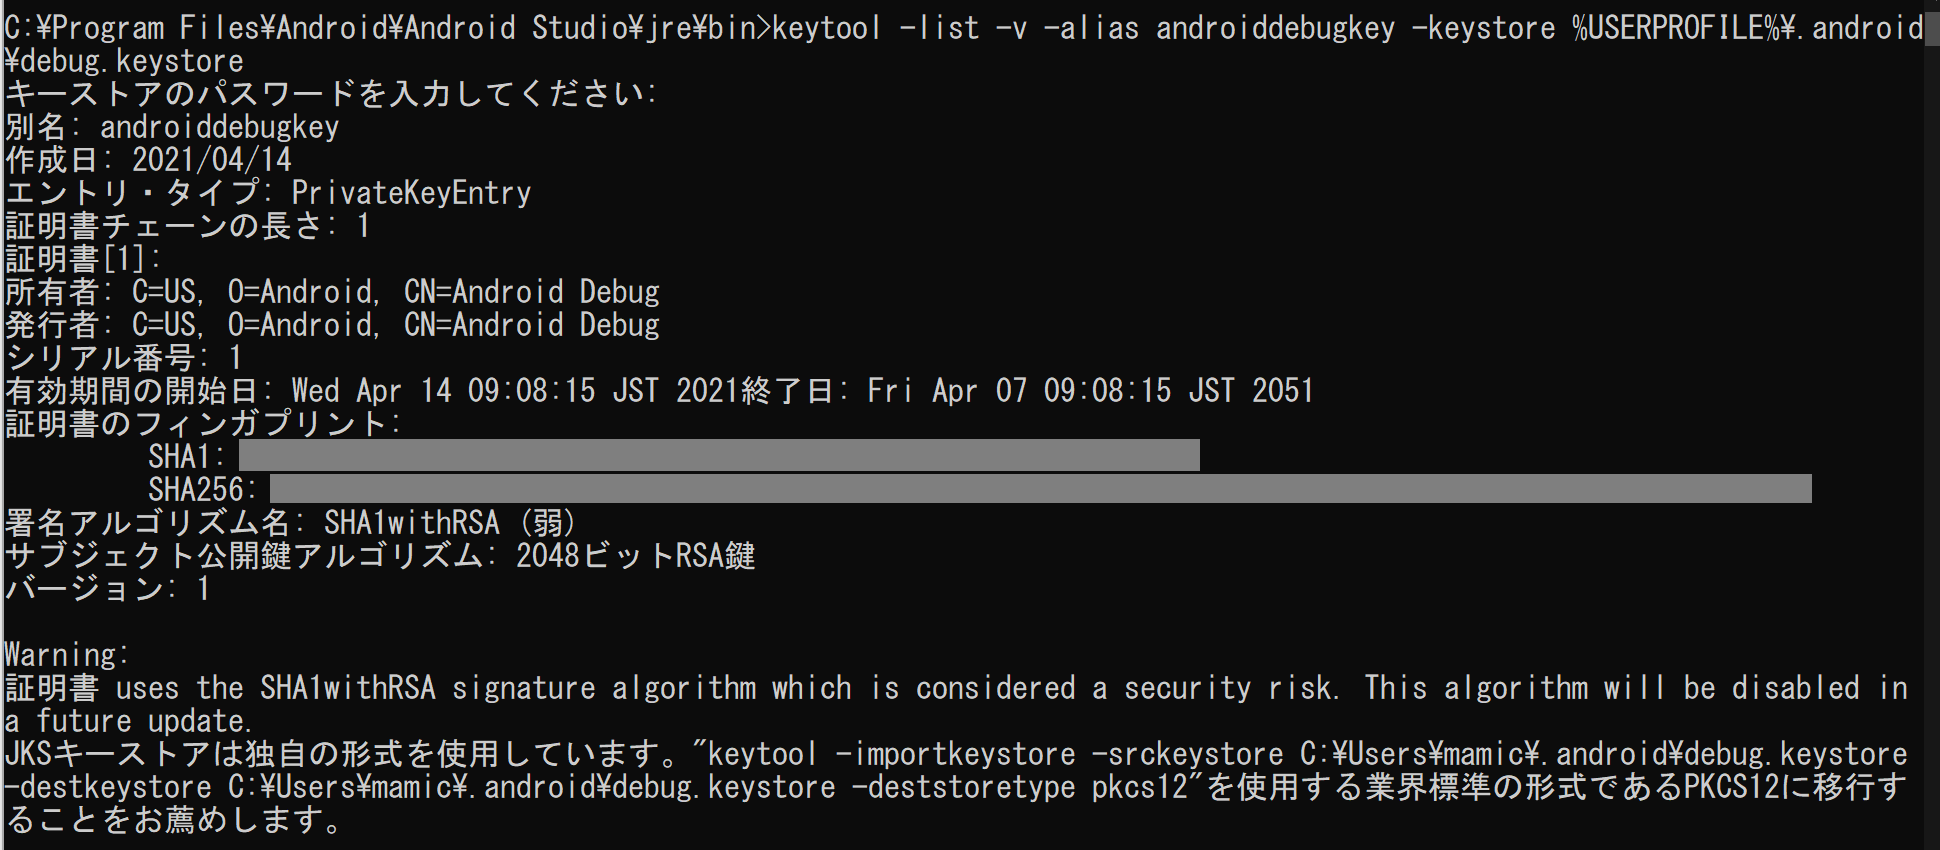
SHA1の部分をコピーして先ほどのデバッグ用の署名証明書SHA1に入力します。
google_service.jsonをダウンロードして所定の場所に置け、とあります。
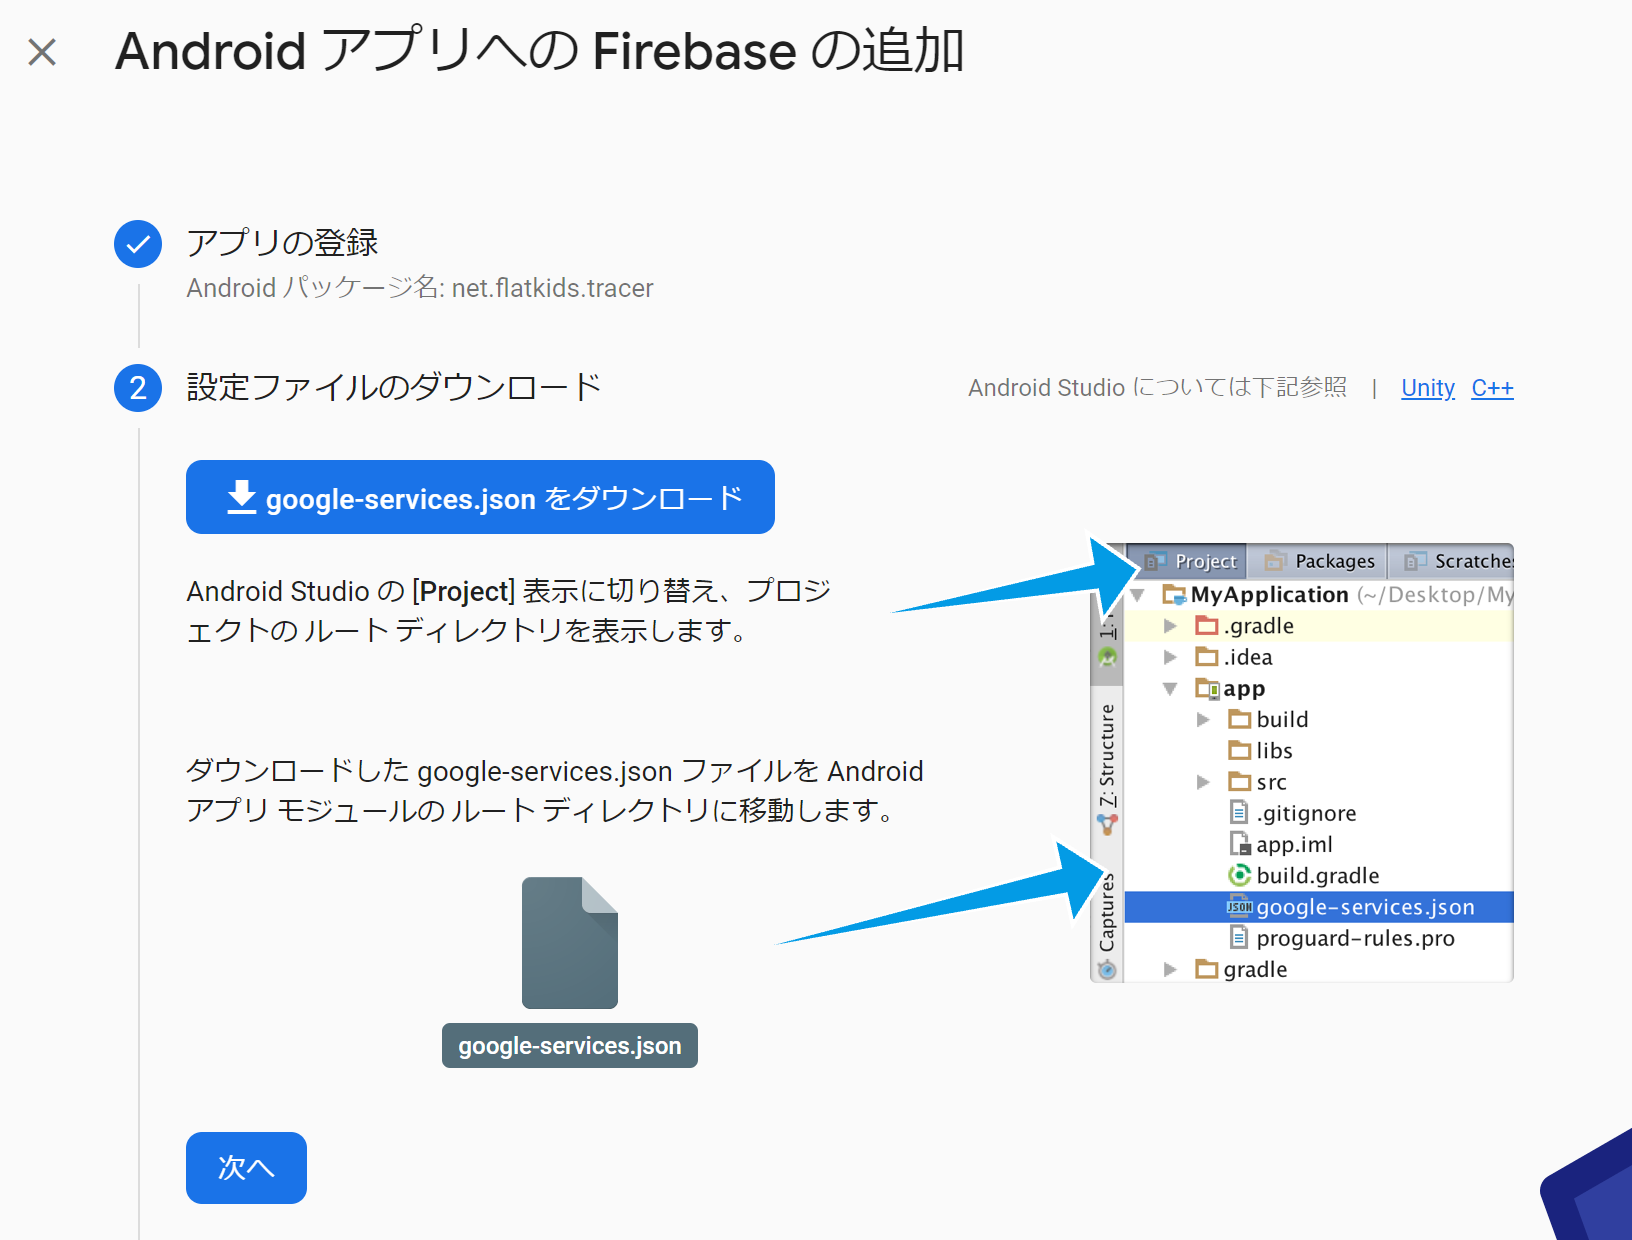
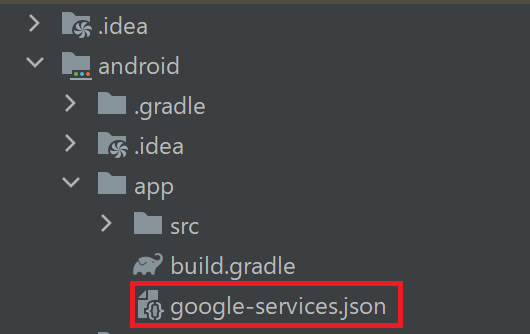
こちらに置きます。
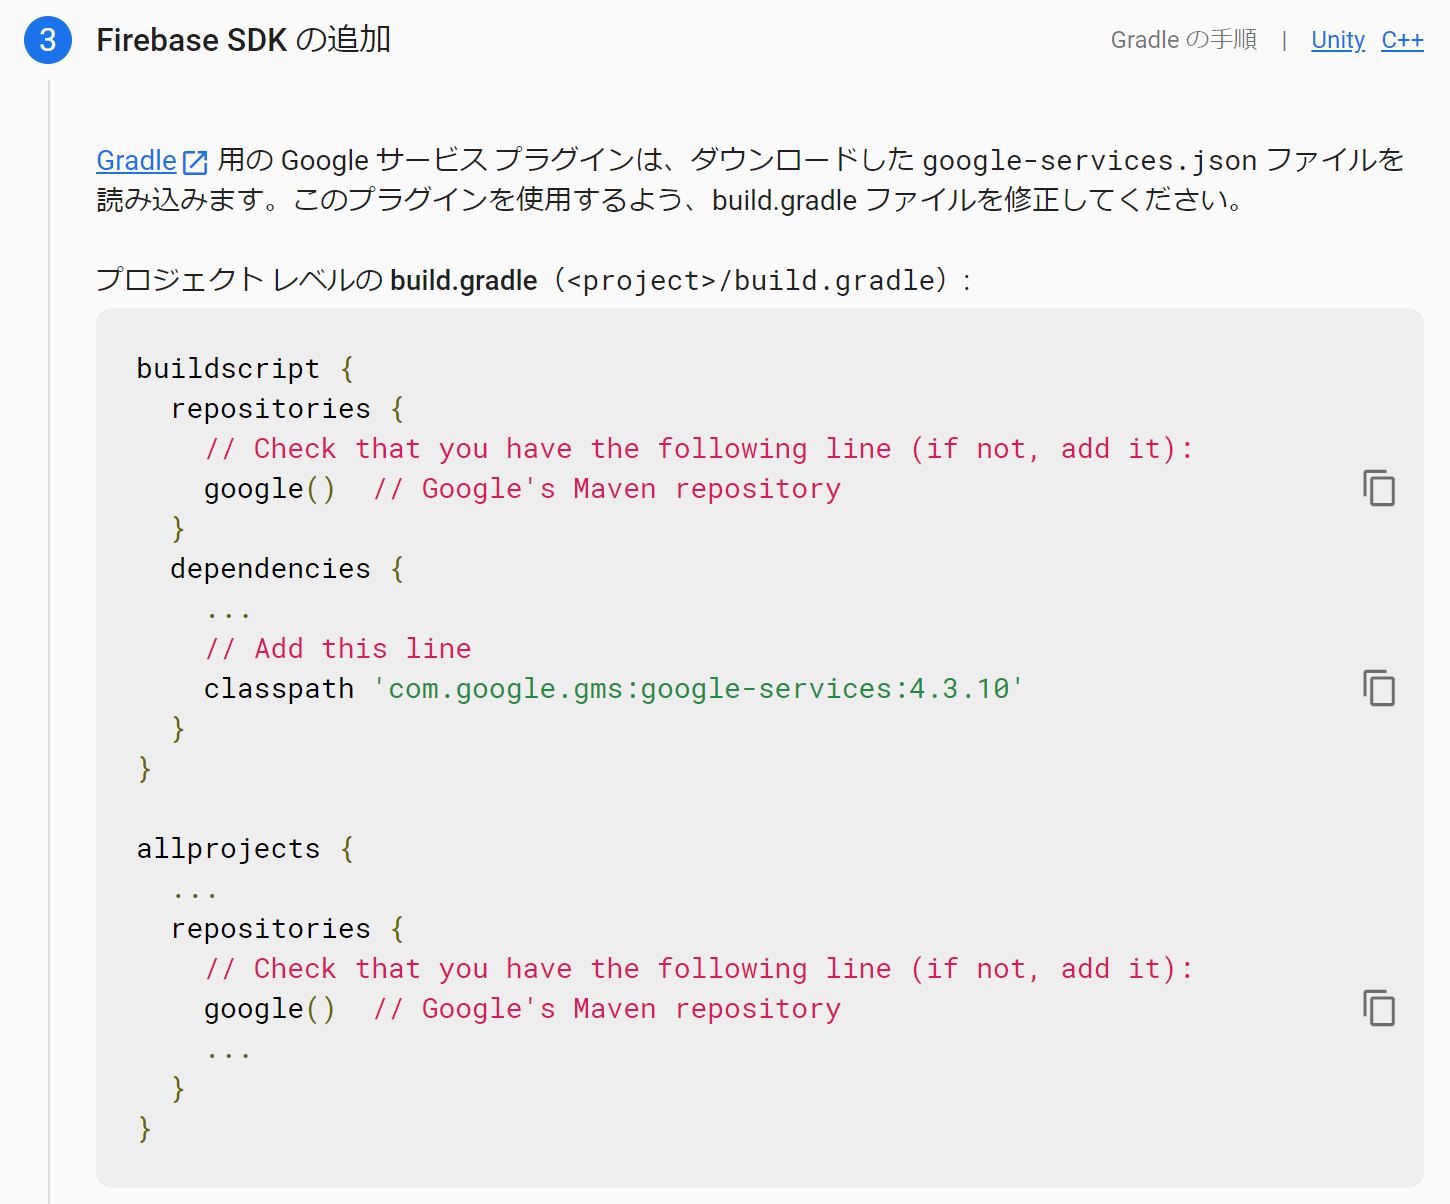
次に、google_service.jsonを読み込むためにソースコードを追記する必要があるそうです。
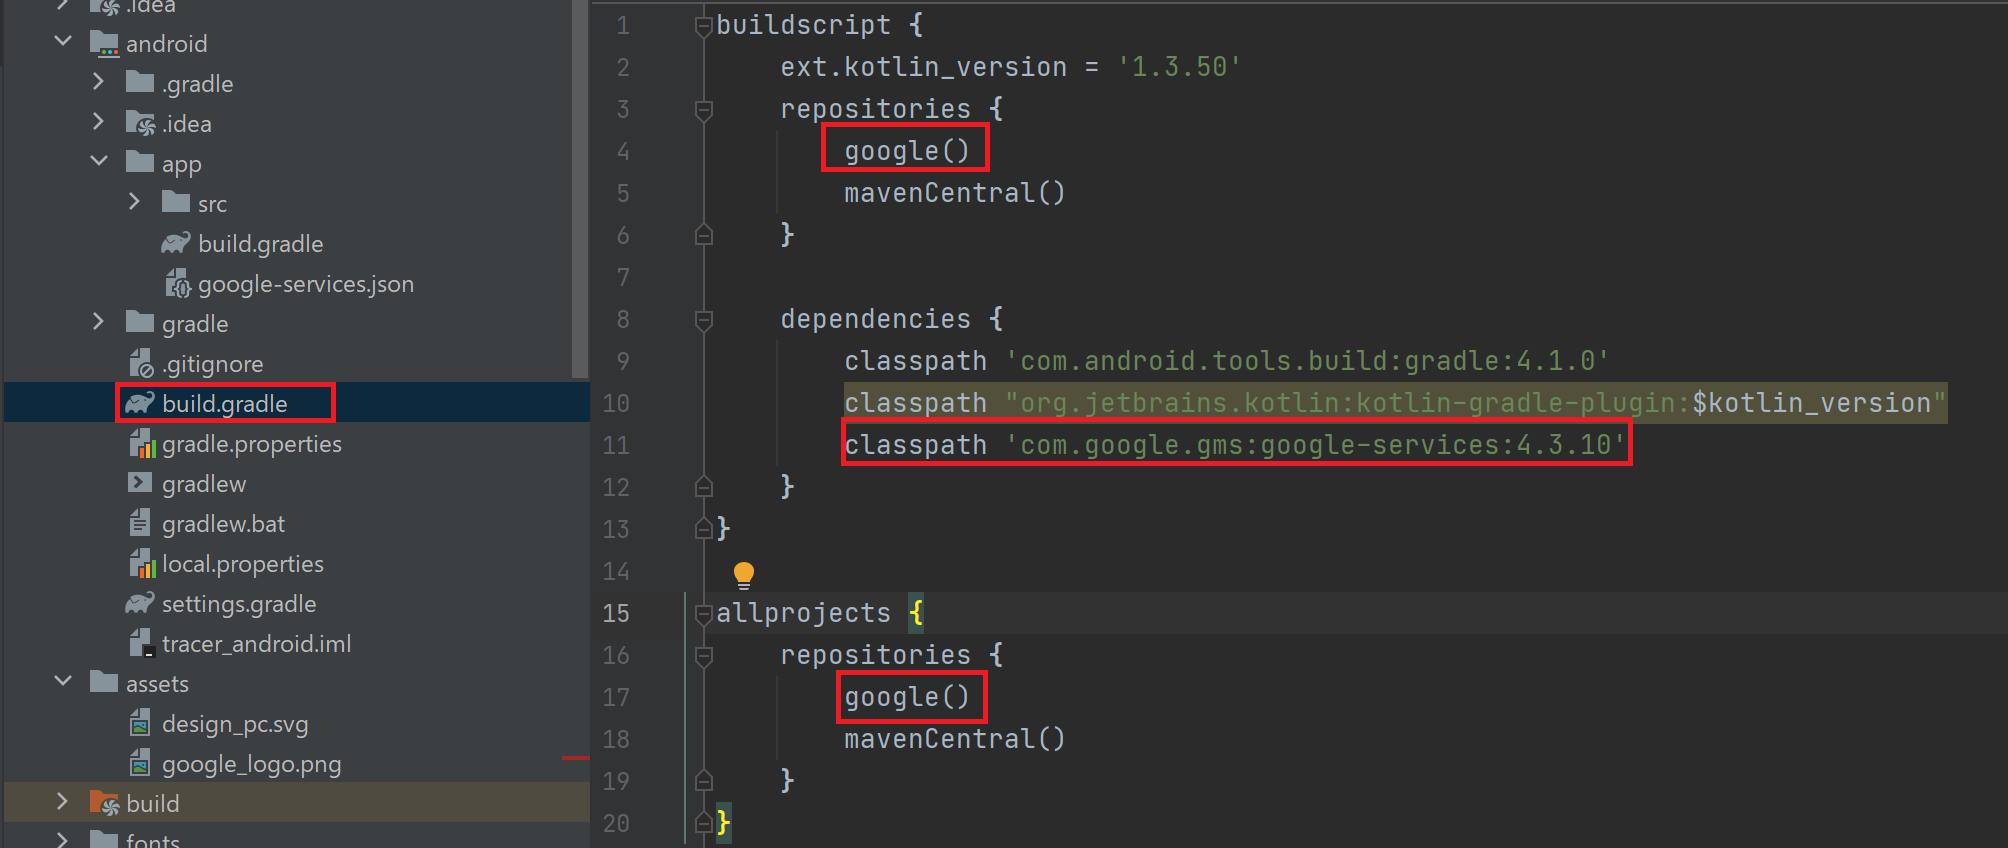
赤枠部分を追加(最初からあるものもある)します。
補足:現時点で以下がエラーになるので、「GrandleException」を「FileNotFoundException」に変更します。

そして、同期してね、という事なので、

Android Studioでは「Open for Editing in Android Studio」をクリックします。(これで同期)

設定(ios編)
※Macにて実施している前提で進めます。
Androidとiosの両方を設定する方はAndroidで作成したプロジェクトにアプリを追加します。もしFirebaseプロジェクトを作成されていない方はFirebase Console(https://console.developers.google.com/)からプロジェクトを新規作成します。
以下から追加します。

iosアイコンを選びます。

以下のような表示になります。
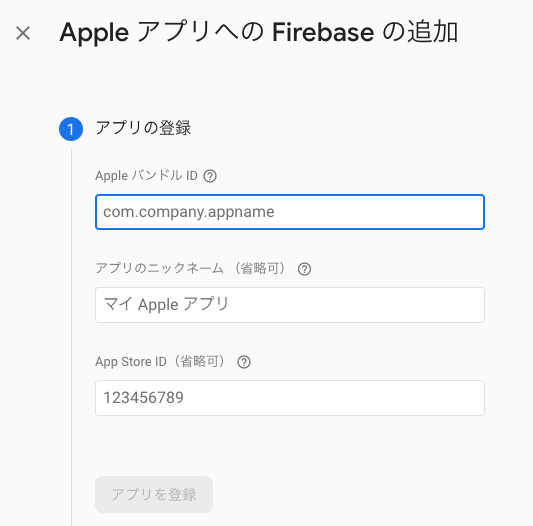
AppleハンドルIDはXcodeで調べます。
[Tools]-[Flutter]-[Open ios module in Xcode]
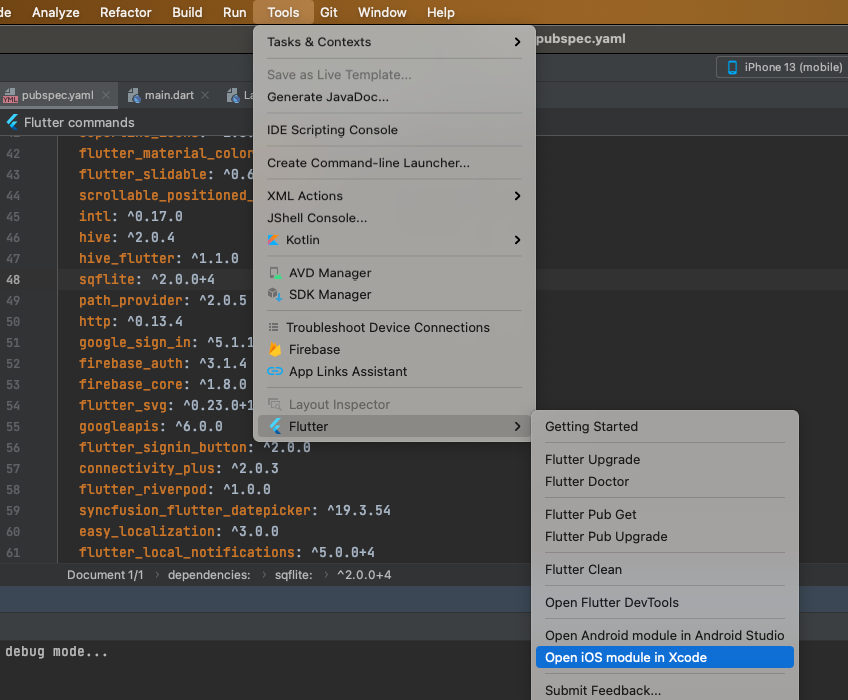
もしくはターミナルにてiosフォルダに移動し、「open Runner.xcworkspace」と入力するとXcodeで以下画面が立ち上がります。

Bundle IdentifierをAppleハンドルIDに入れて次に進みます。(Xcodeは後で使うのでそのままにしてください。)
GoogleService-info.plistをダウンロードします。
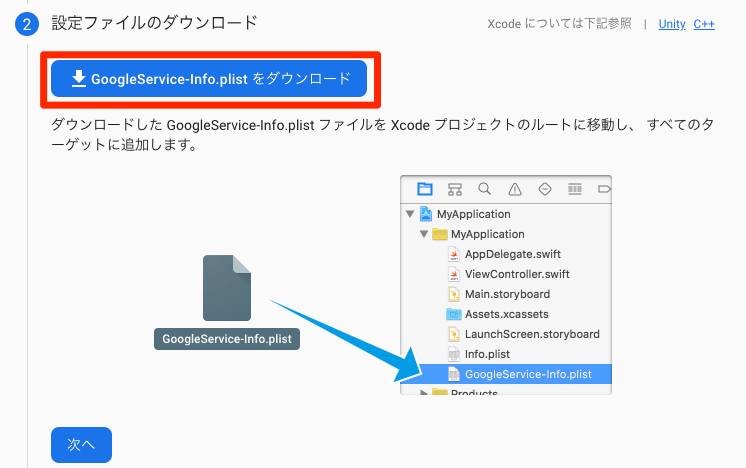
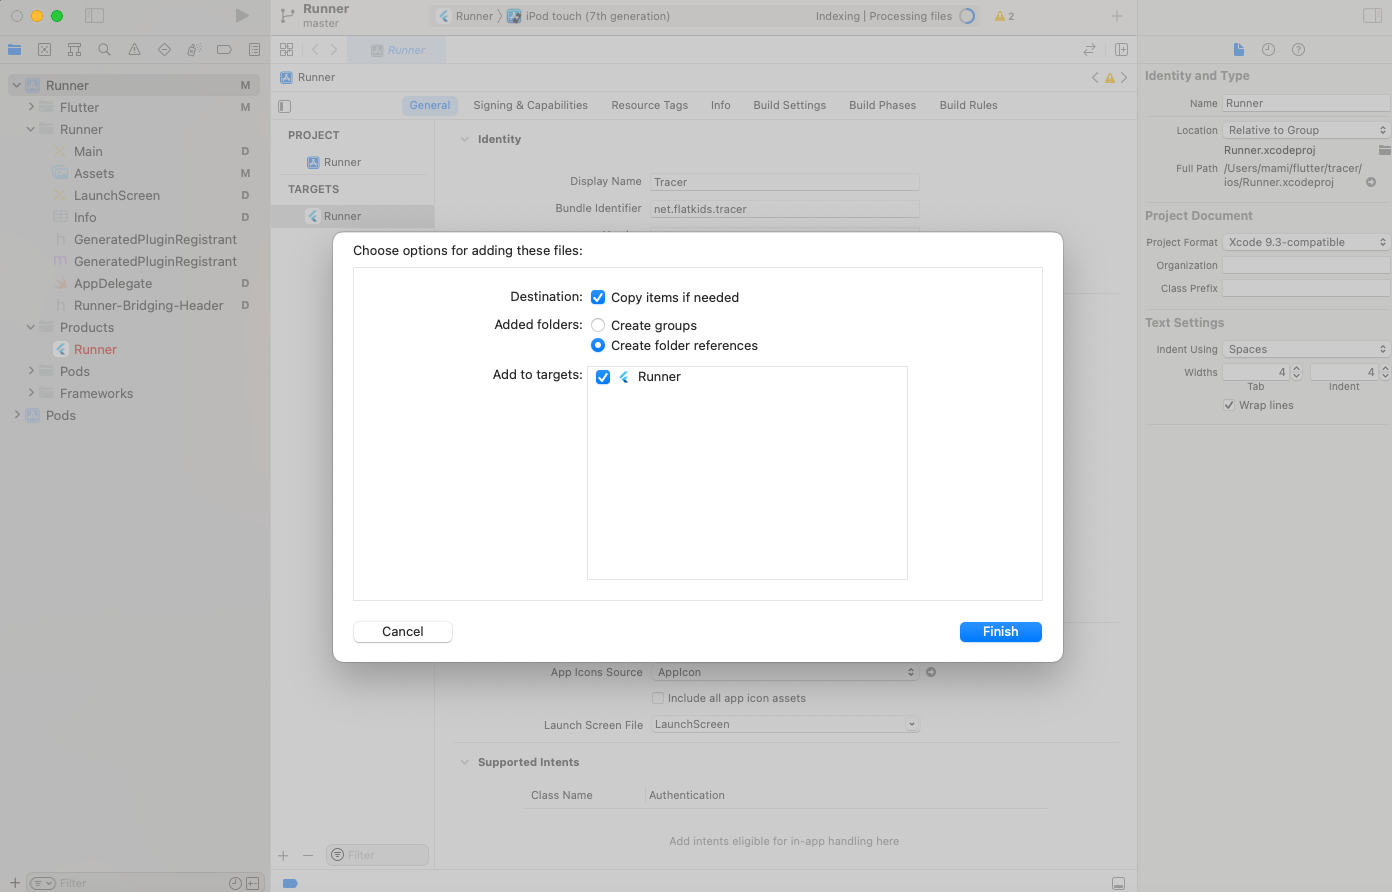
またXcodeに戻り、ダウンロードしたGoogleService-info.plistをios/Runnerに追加します。

以下のような画面が表示されるのでFinishします。
ログイン用ソースコード
ログイン画面に何もないと少し寂しいので、少しオシャレな感じにします。(センスの無さ如何ともし難い…)ログインボタンさえあればOKです。

Signin画像はこちらからダウンロードした画像です。画像はassetsフォルダに配置しpubspec.yamlに以下を追加します。
flutter:
  assets:
    - assets/
Signinボタンを押下すると、以下のようにFirebaseが勝手にしてくれます。ありがたや。
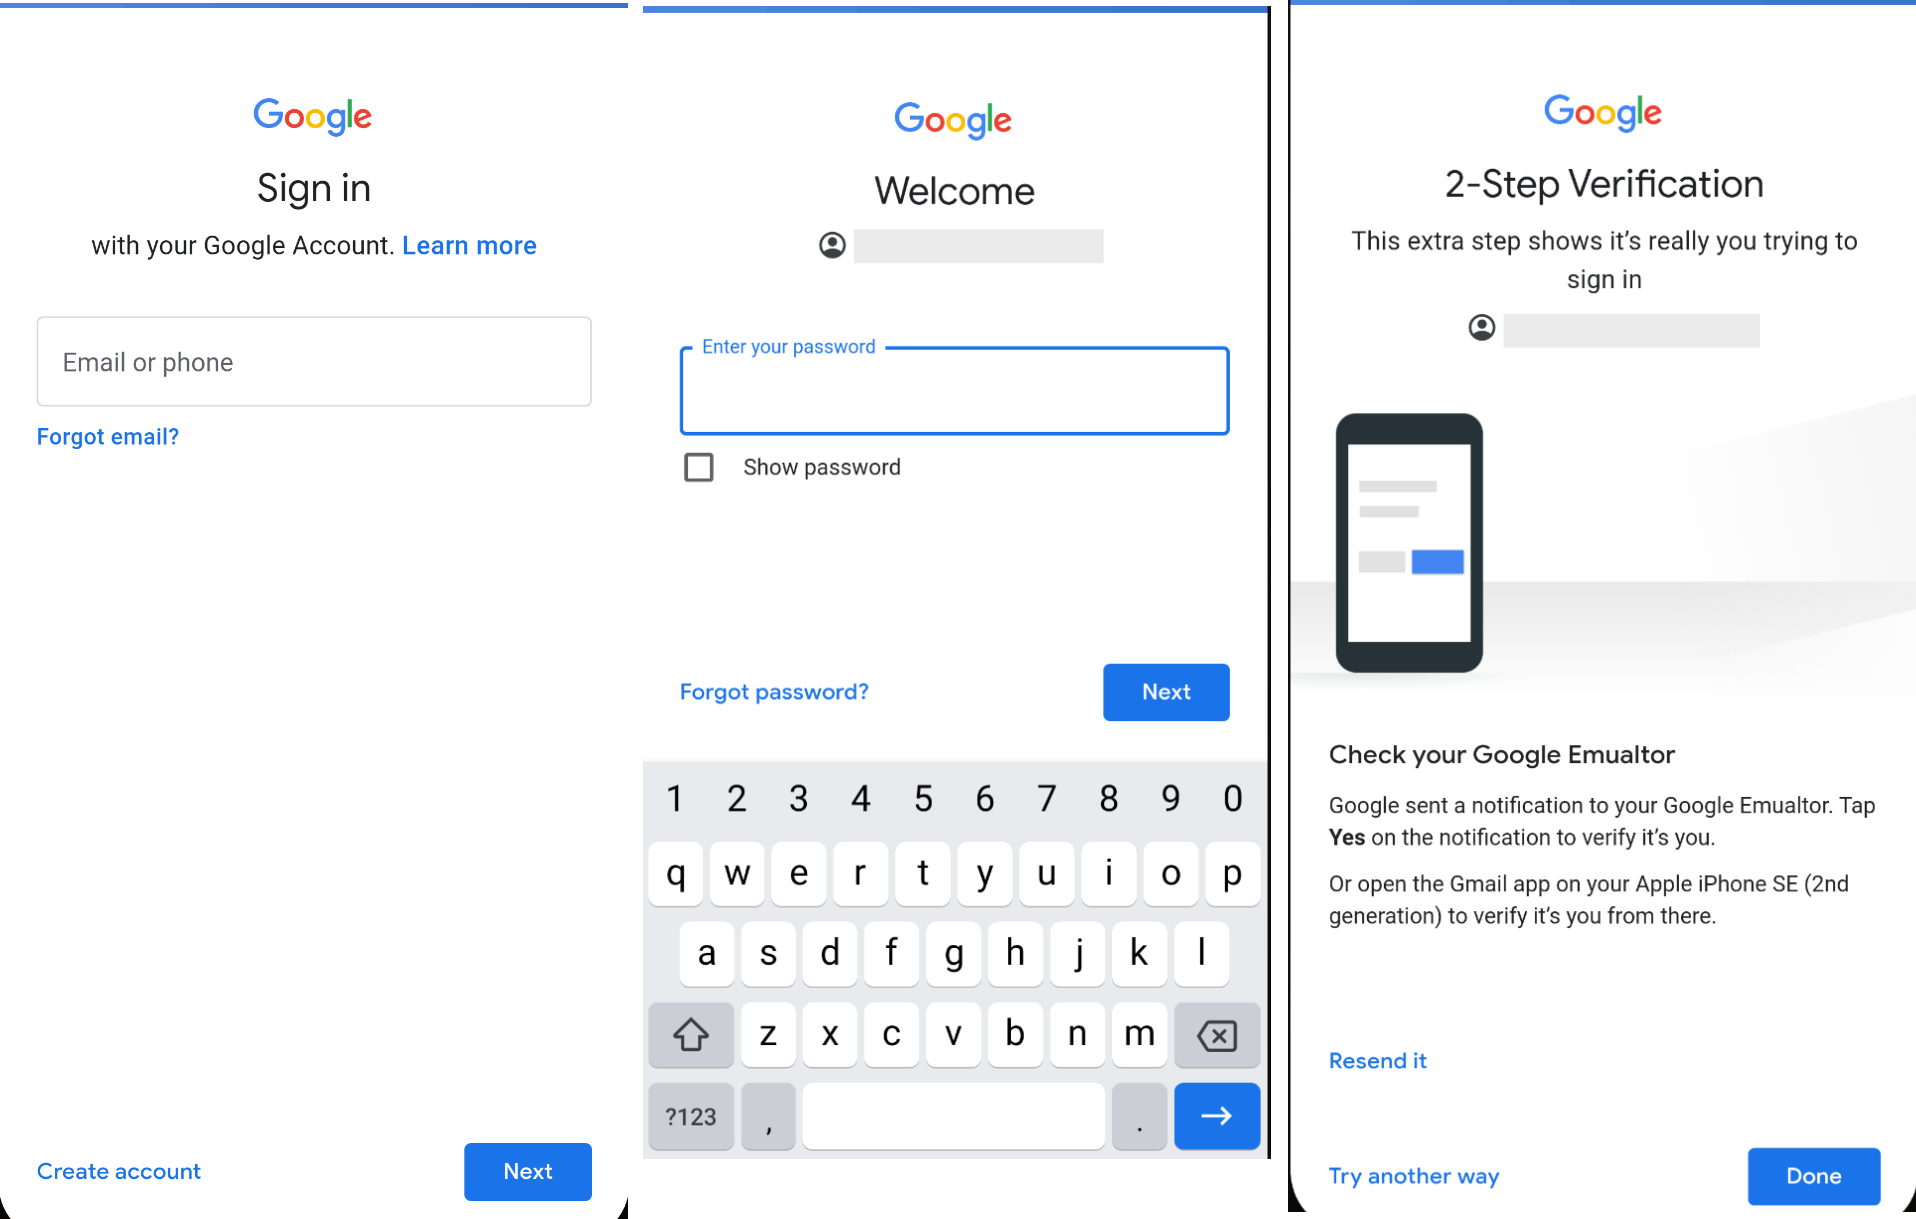
google_login.dartというファイルを作り、以下を書きます。
import 'package:flutter/material.dart';
import 'package:flutter_svg/flutter_svg.dart';
import 'package:firebase_auth/firebase_auth.dart';
import 'package:firebase_core/firebase_core.dart';
import 'package:google_sign_in/google_sign_in.dart';

import 'package:flutter_signin_button/flutter_signin_button.dart';
import 'package:tracer/routes/google_login_info.dart';

import '../baseappbar.dart';

class GoogleLogin extends StatefulWidget {
  const GoogleLogin({Key? key}) : super(key: key);

  @override
  _GoogleLoginState createState() => _GoogleLoginState();
}

class _GoogleLoginState extends State<GoogleLogin> {
  bool _isSigningIn = false;

  @override
  Widget build(BuildContext context) {
    Size size = MediaQuery.of(context).size;
    return Scaffold(
      appBar: BaseAppBar(
        title: const Text('Upload',style: TextStyle(color: Colors.black54)),
        appBar: AppBar(),
      ),
      backgroundColor: Colors.white12,
      body:SafeArea(
        child: Column(
          mainAxisSize: MainAxisSize.max,
          children: <Widget>[
            ClipPath(
              clipper: MyClipper(),
              child: Container(
                margin: const EdgeInsets.only(bottom: 10.0 * 2.5),
                height: size.height * 0.6,
                width: double.infinity,
                decoration: const BoxDecoration(
                  color: Colors.pinkAccent,
                ),
                child: Column(
                  children: <Widget>[
                    Expanded(
                      child: Padding(
                        padding: const EdgeInsets.all(10.0),
                        child: SvgPicture.asset(
                          "assets/design_pc.svg",
                          fit: BoxFit.fitWidth,
                          // alignment: Alignment.bottomCenter,
                        ),
                      ),
                    ),
                  ],
                ),
              ),
            ),
            FutureBuilder(
              future: initFirebase(),
              builder: (context, snapshot) {
                if (snapshot.hasError) {
                  return const Text('Error initializing Firebase');
                } else if (snapshot.connectionState == ConnectionState.done) {
                  return Padding(
                    padding: const EdgeInsets.only(bottom: 16.0),
                    child: _isSigningIn
                        ? const CircularProgressIndicator()
                        : SignInButton(
                    Buttons.Google,
                    onPressed: () async {
                      setState(() {
                        _isSigningIn = true;
                      });
                      User? user = await signIn();
                      setState(() {
                        _isSigningIn = false;
                      });

                      if (user != null) {
                        Navigator.of(context).pushReplacement(
                          MaterialPageRoute(
                            builder: (context) => GoogleLoginInfo(
                              user: user,
                            ),
                          ),
                        );
                      } else {
                        AlertDialog(
                          title: const Text('Error'),
                          content: const Text('Google sign in failed.'),
                          actions: <Widget>[
                            TextButton(
                              child: const Text("OK"),
                              onPressed: () => Navigator.pop(context),
                            ),
                          ],
                        );
                      }
                    },
                    )
                  );
                }
                return const CircularProgressIndicator();
              },
            ),
          ],
        ),
      )
    );
  }

  Future<FirebaseApp> initFirebase() async {
    FirebaseApp firebaseApp = await Firebase.initializeApp();

    User? user = FirebaseAuth.instance.currentUser;

    if (user != null) {
        MaterialPageRoute(
          builder: (context) => GoogleLoginInfo(
            user: user,
          ),
        ),
      );
    }

    return firebaseApp;
  }


  Future<User?> signIn() async {
    FirebaseAuth auth = FirebaseAuth.instance;
    User? user;

    GoogleSignIn googleSignIn = GoogleSignIn();
    GoogleSignInAccount? googleSignInAccount = await googleSignIn.signIn();

    if (googleSignInAccount != null) {

      GoogleSignInAuthentication googleSignInAuthentication = await googleSignInAccount.authentication;
      Map<String, String> authHeaders = await googleSignInAccount.authHeaders;

      AuthCredential credential = GoogleAuthProvider.credential(
        accessToken: googleSignInAuthentication.accessToken,
        idToken: googleSignInAuthentication.idToken,
      );

      try {
        UserCredential userCredential = await auth.signInWithCredential(credential);
        user = userCredential.user;
      } on FirebaseAuthException catch (e) {
        user = null;
      }
    }
    return user;
  }
}


class MyClipper extends CustomClipper<Path> {
  @override
  Path getClip(Size size) {
    var path = Path();
    path.lineTo(0, size.height - 80);
    path.quadraticBezierTo(
        size.width / 2, size.height, size.width, size.height - 80);
    path.lineTo(size.width, 0);
    path.close();
    return path;
  }

  @override
  bool shouldReclip(covariant CustomClipper<Path> oldClipper) {
    return false;
  }
}
ログアウト用ソースコード
ログアウトはGoogleSpreadSheetsの処理を追加したいので、今はシンプルにします。
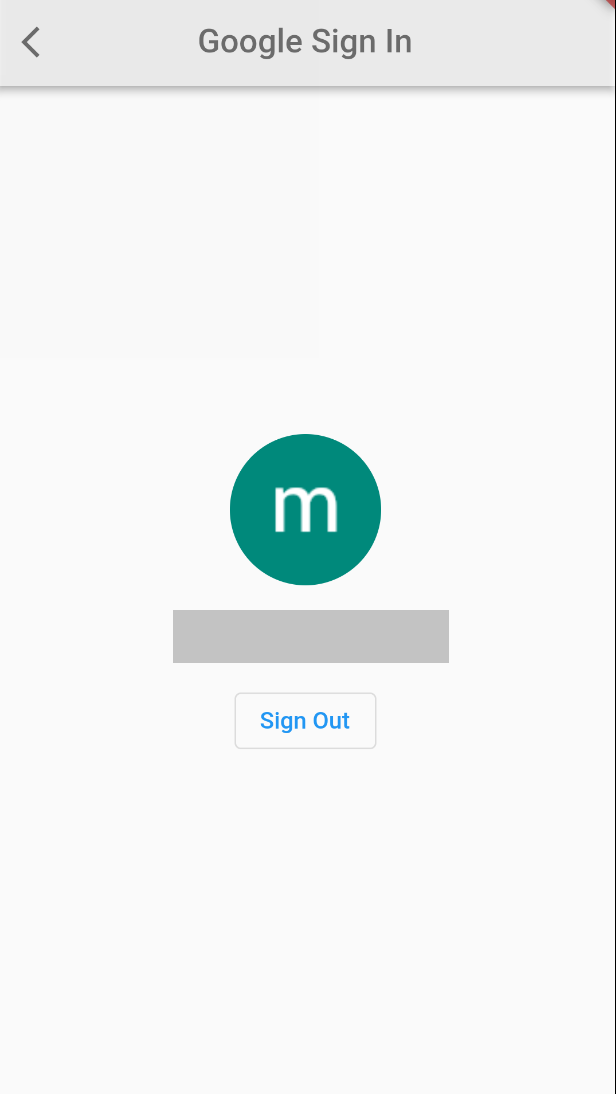
google_login_info.dartというファイルを作り、以下を書きます。
import 'package:firebase_auth/firebase_auth.dart';
import 'package:flutter/material.dart';
import 'package:google_sign_in/google_sign_in.dart';

import 'package:tracer/routes/google_login.dart';

import '../baseappbar.dart';

class GoogleLoginInfo extends StatefulWidget {
  const GoogleLoginInfo({Key? key, required User user})
      : _user = user,
        super(key: key);

  final User _user;

  @override
  _GoogleLoginInfoState createState() => _GoogleLoginInfoState();
}

class _GoogleLoginInfoState extends State {
  late User _user;
  bool _isSigningOut = false;

  @override
  void initState() {
    _user = widget._user;

    super.initState();
  }

  @override
  Widget build(BuildContext context) {
    return Scaffold(
      appBar: TransAppBar(
        title: 'Google Sign In',
        appBar: AppBar(),
      ),
      body: SafeArea(
          child: Column(
            mainAxisAlignment: MainAxisAlignment.center,
            children: [
              Row(),
              _user.photoURL != null
                  ? ClipOval(
                    child: Material(
                      color: Colors.white60,
                      child: Image.network(
                        _user.photoURL!,
                        fit: BoxFit.fitHeight,
                      ),
                    ),
                  )
                  : const ClipOval(
                      child: Material(
                        color: Colors.black12,
                        child: Padding(
                          padding: EdgeInsets.all(16.0),
                          child: Icon(
                            Icons.person,
                            size: 60,
                            color: Colors.deepOrange,
                          ),
                        ),
                      ),
                    ),
              const SizedBox(height: 16.0),
              Text(
                _user.displayName!,
                style: const TextStyle(
                  fontSize: 26,
                ),
              ),
              const SizedBox(height: 16.0),
              if (_isSigningOut) const CircularProgressIndicator(
                  valueColor: AlwaysStoppedAnimation(Colors.white),
                ) else OutlinedButton(
                  child: const Text('Sign Out'),
                  onPressed: () async {
                    setState(() {
                      _isSigningOut = true;
                    });
                    await signOut();
                    setState(() {
                      _isSigningOut = false;
                    });
                    Navigator.of(context).pushReplacement(
                      MaterialPageRoute(
                        builder: (context) => const GoogleLogin(),
                      ),
                    );
                  },
                )
            ],
          ),
        ),
    );
  }

  Future signOut() async {
    final GoogleSignIn googleSignIn = GoogleSignIn();
    await googleSignIn.signOut();
    await FirebaseAuth.instance.signOut();
  }
}
SignOutするとログイン用画面に戻るようにしてあります。
これで①Googleにログイン編は終わりです。










コメント